This document will serve as the Technical Install Guide for any operation run by Bizzfo.
Components usually contain the following:
1. Hardware Install
i. Terminal Setup
ii. Printer Setup
iii. Biometric Reader setup
iv. Cashdrawer Setup
v. Label Printer Setup
vi. A4 Printer Setup
- Software Install
i. Bizzfo Install and Update
ii. Regional Settings
iii. Firewall Ports
iv. Sharing Settings
v. Slip Setup
vi. Program Options
vii. Hive Sync1.i. Terminal Setup:
When first receiving a PC or connecting to an existing Terminal that needs installations, the following components are required:
1. Minimum of Windows 10 or above
2. WinRAR – For Database Extractions (https://www.win-rar.com/download.html?&L=0 )
3. Anydesk – For unattended access (https://anydesk.com/en/downloads/windows )
4. Note of and Antivirus that might block connections.
After Installing Anydesk, please set up the Uninterrupted Access:

The default password to be set is: Bizzfo@01
After Winrar and Anydesk has been installed, you can proceed to section 2.
1.ii. Printer Setup:
With this step, our goal is to successfully print a test page through Windows to the printer.
First, we need to find out what the Make and Model of the printer is as this will tell us which driver to download.
Secondly, we need to find out how the printer will be connected to the Terminal (Network of USB)
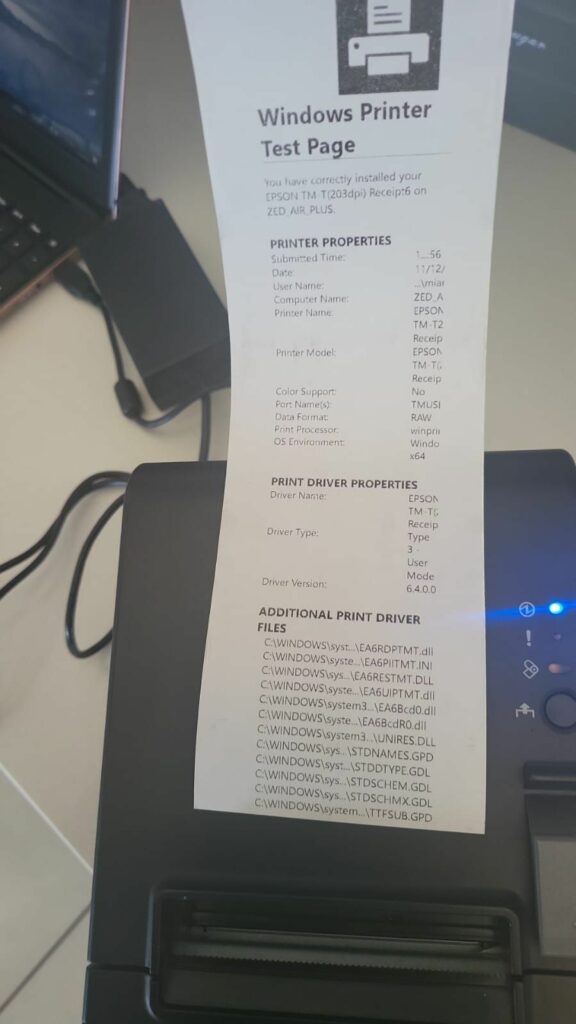
After installing the correct Driver and setting it to the correct method of Printing, you can perform a Windows Test Print:

If a test page successfully prints, you can then move onto the 3rd part as Bizzfo will be able to configure on the printer. If no test page prints, make sure that the printer is on and plugged in correctly.
If on a USB, confirm which port through Device Manager.
If on Network, try and ping the Printer to see if the connection goes through.
For this you will need to open command prompt, and type in: ping 192.168.192.168 (Just use the Printer IP)
Lastly, to print a Diagnostic page from the printer, switch it off, hold in the feed button and turn the printer on again while still holding the feed button. In about 2-4 seconds, the Diagnostic page will print.
The below is a reference of what your Windows Test Page will look like:
1.iii. Biometric Setup:
Bizzfo has specific drivers for the Digital Persona HID Unit:
https://bizzfo.co.za/bizzfoPOS/RTE.zip
The unit will typically look as follows:

After the device is connected VIA USB, you can run the install.
The rest we will configure in Bizzfo Program Options once Software install begins.
iv. Cashdrawer Setup
The connection of the Cashdrawer is ussually the RJ11 connector (Smaller than your Ethernet RJ45)
This plugs into the back of the printer (Slip Kick) – This is not to be plugged into network port.

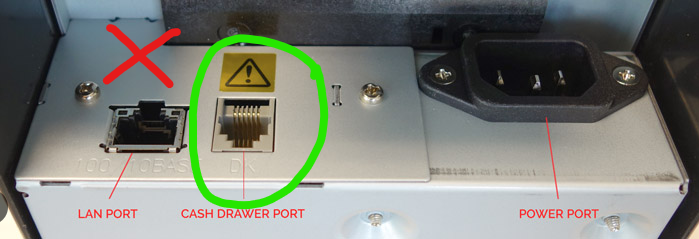
The Cashdrawer lock must also be not be closed.
On connection of the Cable to the printer, you can proceed to the next point.
2.i. Bizzfo Install and Update:
Firstly, you will need to find out if the terminal is a 32bit or 64bit unit (Windows).

From here, you can then download the correct install file for Bizzfo:
https://bizzfo.co.za/downloads/
After installing Bizzfo, you will need to update to the latest version:
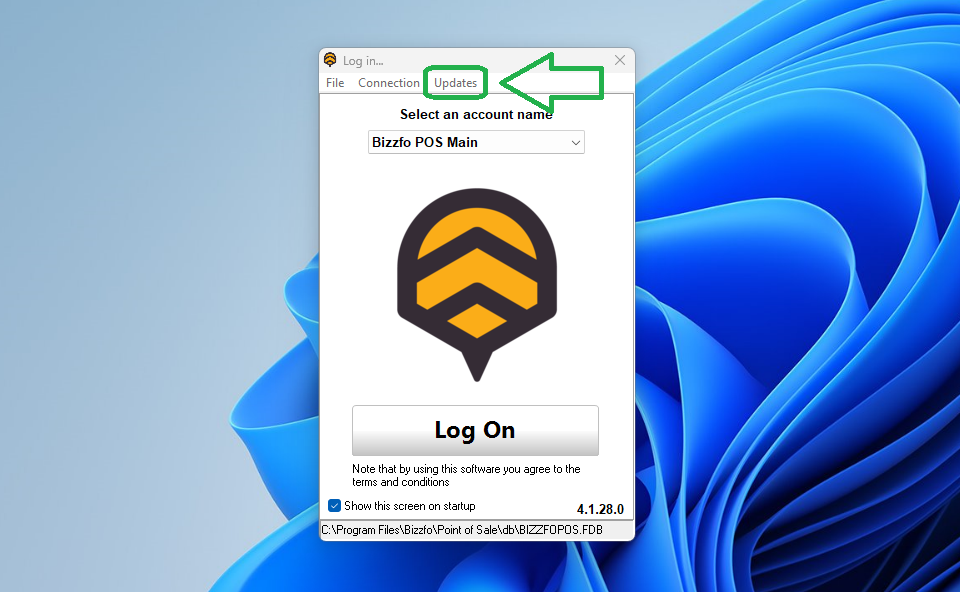
Make sure that you have updated correctly and that all terminals are running on the latest version.
Now that Bizzfo is installed, you can deploy the Database on the Selected “SERVER” PC.
To do this, you will need to place the Database file in the DB folder in Bizzfo as such:
C:\Program Files\Bizzfo\Point of Sale\db

Once Bizzfo has been installed, updated and the Database deployed, we can now proceed to system setup.
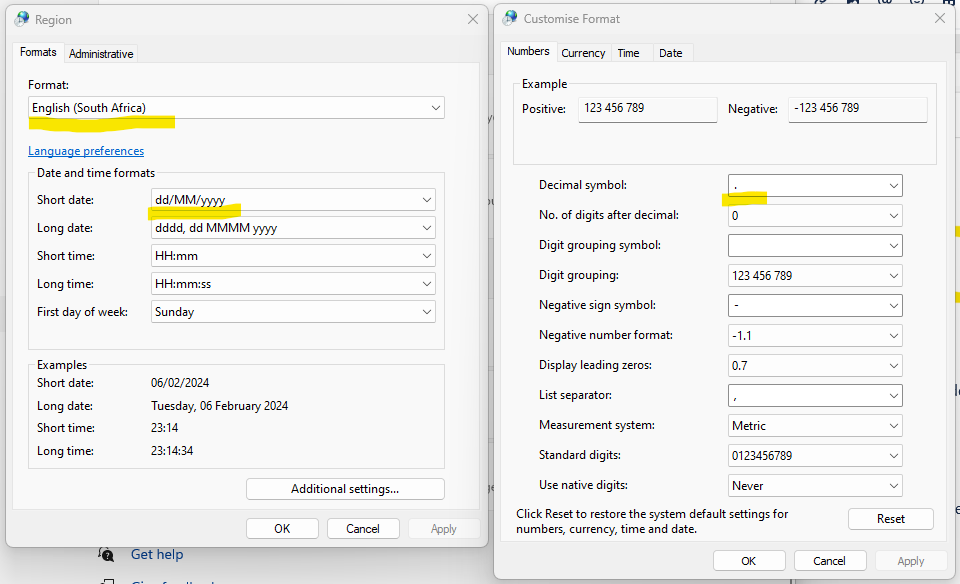
2.ii. Regional Settings:
There are 5 very important items to consider when doing the regional settings:
(These are Windows Regional settings)
1. Currency
2. The Deliminator
3. The Date Format
4. The correct date is set
5. Correct Time Zone
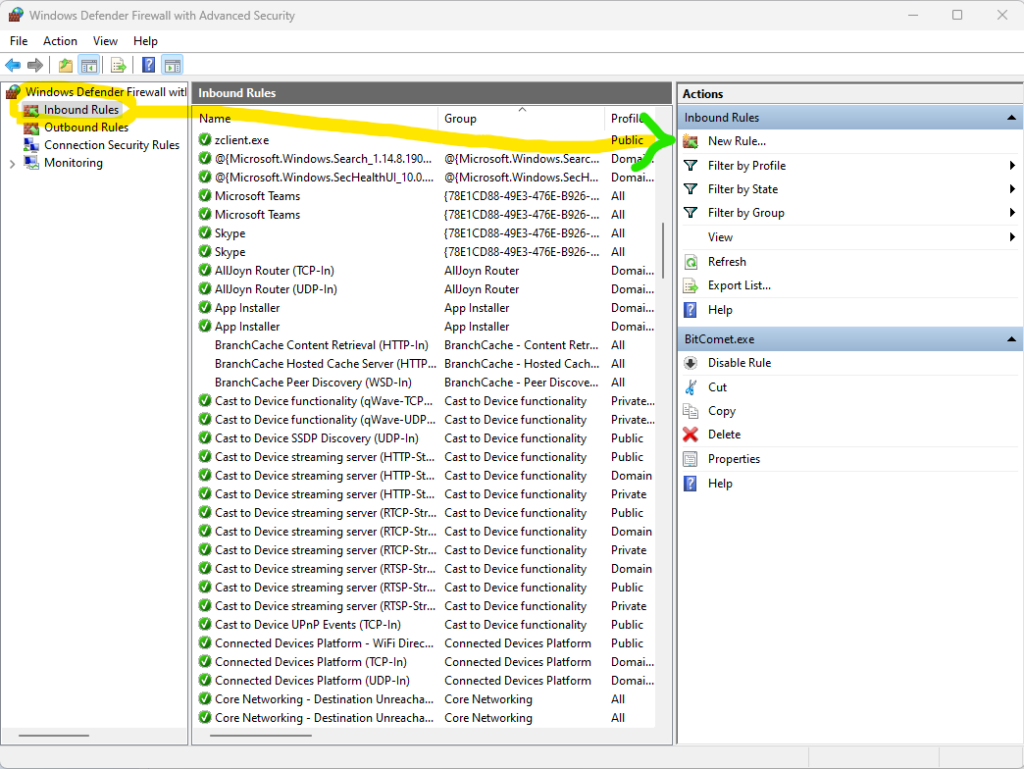
2.iii. Firewall Ports:
Bizzfo communicates through specific ports and when installing the software these ports need to be opened to pass through Firewall.
We will need to set Inbound and Outbound Rules.
The port in question is Port 3050
It is setup as thus:
Navigate to “Windows Defender Firewall with Advanced Security”
Select Inbound Rule and creat new rule
You then select “Port” and create a Specific local port 3050:
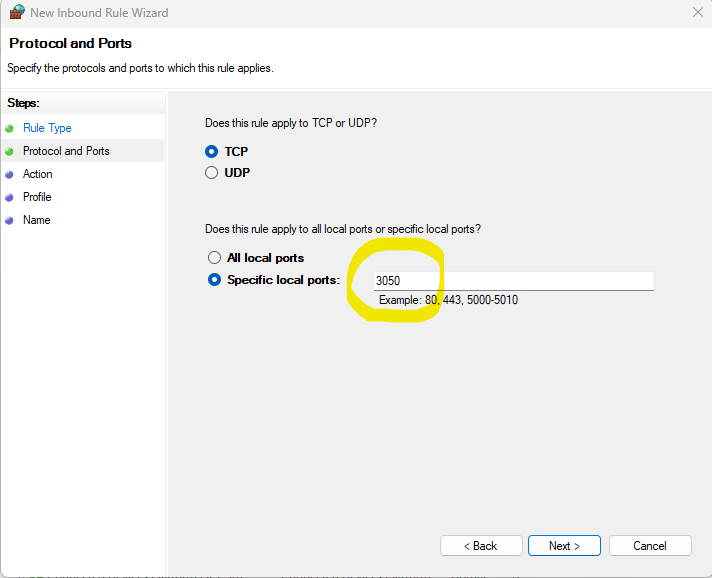
Then select “Allow the connection”, Make sure the the rule applies to Domain, Private and Public networks, Name the connection and you are done.
Now the exact same needs to be done with Outbound Rule as well.
2.iv. Sharing Settings:
For sharing settings, we can navigate to “Manage advanced sharing settings”
For Printer sharing, make sure it’s enabled for all network types.
Also allow Network discovery as this may sometimes block connection to the terminal as well

2.v. Slip Setup:
When setting up Bizzfo for the first time, you will need to configure the Slip.
I will cover the Basic slip setup here but for more specialized slip setups, please reach out to the Bizzfo Team.
Firstly, let’s set our Company Information:

This is what will display on our slip.
Next we can customize our slip:

Lastly, by selecting “Print Options” at the bottom of this screen, we can set notes on our invoices and allocate a logo:
You basic slip setup is now complete!
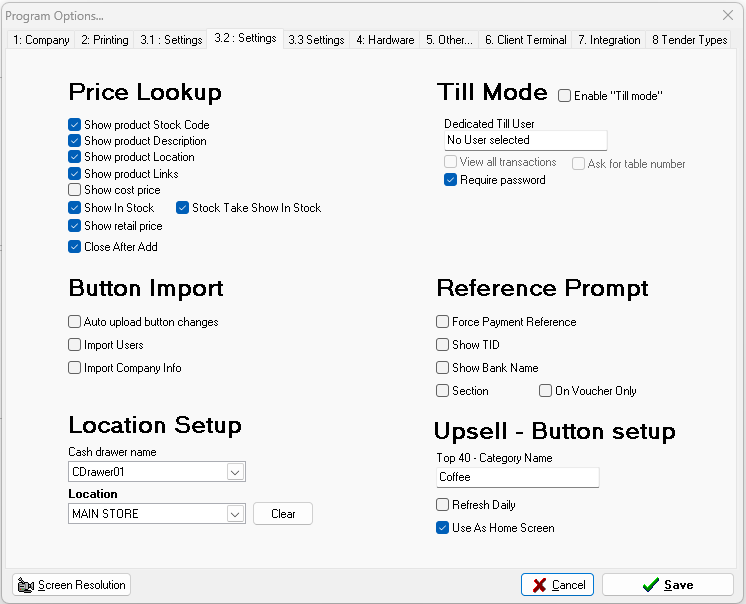
2.vi. Program Options:
The program options will vary largely from store to store.
Please take some time working through these settings as this can change your whole experience in Bizzfo from handling rounding, your sales interface, how the software behaves, your process flow and many more.
Below is the Primary 3 screens for configuring your Program options to enable the features you need and allow the workflow you require:


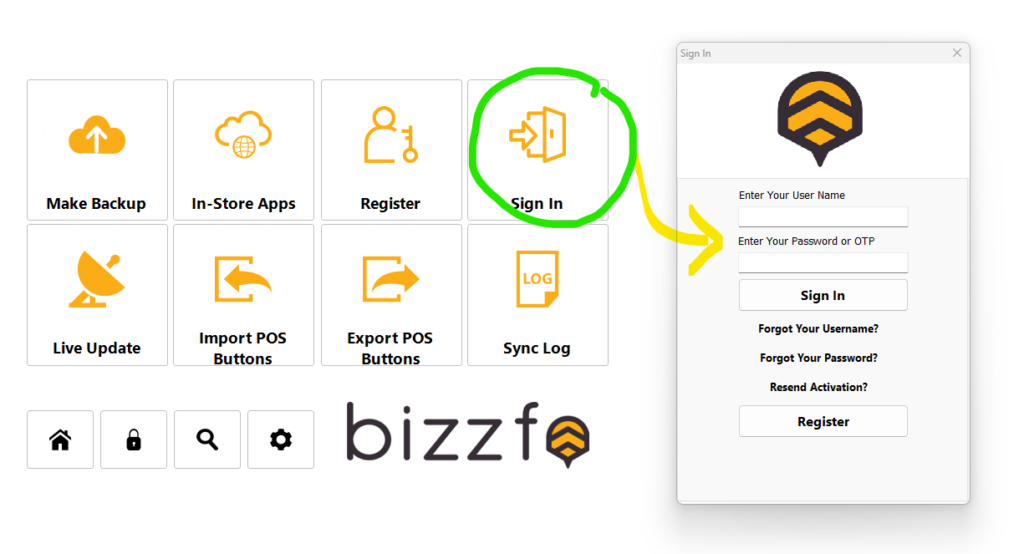
2.vii. Hive Sync:
The last step to completing your basic setup, is to sync your Bizzfo to your Online Hive account.
You can create your account here:
https://hive.bizzfo.co.za/
After you have you credentials, you can then proceed to link your Bizzfo Software to your Hive Account through the Program Options:
Secondly, after signing in, navigate to Tab 5 in Program Options to set the sync ID (To which Hive warehouse you want to sync with):

Happy Trading!


